“Foundation Training” - The Science Behind Starting Your Young Horse Successfully
(Taken from an article published in the NZ Show Circuit Magazine)
The system that Jody Hartstone uses for “Foundation Training” is loosely based on the methods of Australian horseman Kel Jeffrey that she learnt via Dr Andrew McLean of Equitation Science International.
“When I first learnt this method it was so different from anything I was used to. No lunging, no long reining, no round penning and no side reins or tie downs! But it only took one or two horses before I could see the benefits of a horse-centered, scientific method to starting horses. The process was so safe, quick and simple. We call it foundation training as you are literally laying the foundation for the horse’s future”
“Breaking-In” or “Starting” young horses is a centuries old phenomenon that started when man first had the idea to climb on a horse’s back to use him for hunting, agriculture and war. It is a phenomenon steeped in tradition which aside from the advent of Natural Horsemanship has changed little over the decades.
The most common method of starting horses we see in New Zealand involves mouthing the horse, lunging with the saddle on, long reining then eventually climbing on board. In the past 20 years or so “Natural Horsemanship” methods have become popular. These methods may include round pen and “Join Up” techniques, one rein stops and lots of neck bending. The theories most “natural” methods are based on often revolve around dominance of the human over the horse, the need to gain “respect” from the horse and even attempting to replicate the “Alpha Mare” in the herd.
Whilst each system has it merits, ethical equestrians should be critically analysing the starting process to ensure that the methods being used will stand up to Best Practice set out recently by the International Society for Equitation Science.
There are 10 Principles of Horse Training laid out by ISES that horse trainers around the world should look to as the gold standard in horse training. Failings in any of these categories can cause confusion and distress in the horse leading to conflict behaviours, aggression or apathy. Not only do these compromise performance, but also horse welfare and rider safety.
A scientific approach to the starting process can be broken down into six basic steps:
- Basic control of the horse’s locomotion on the ground (for control and calmness)
- Habituation to the rider (so the horse gets used to a rider on its back)
- The teaching of signals for acceleration, deceleration, turns of the front and hind quarters (for control when being ridden)
- Habituation to the girth and saddle
- Initial riding under saddle
- Riding the horse out and about in various circumstances whilst maintaining control and calmness
Step 1 - The importance of Ground Work
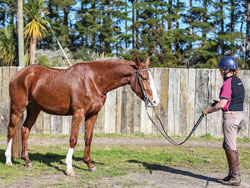 Before legging the rider up on the horse it is imperative that the handler has full control of the horses feet at all times. Failure to do so can leave the horse with permanent flight associations. Begin by teaching the horse to step forward and backward lightly and obediently from both rein and whip signals. The horse learns these signals through a process called negative reinforcement ie pressure release. The horse also needs to be able to “park” which means not following the handler’s feet when they step forwards or move around the horse. This makes the horse’s world more predictable – they learn to only move when cued by an actual signal of the rider and remain calm at all other times. Teaching a head down cue is also worthwhile as it has been shown to lower the heart rate of the horse and induce calmness when coupled with the park.
Step 2 - Habituation to the rider
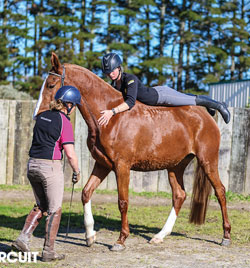 This is done bareback for a number of reasons. Horses, like humans, are social animals and respond well to the soothing effects of touch. This phenomenon is called Attachment Theory. The more you stroke and touch your horse the calmer he will become and a bond will form between horse and human. Without a saddle the rider can touch the horse all over his body and teach the leg aids uninhibited by girth pressure which some horses find intolerable at this early stage.
Habituation to the rider is done using the technique of Overshadowing, where the handler steps the horse forward and back at each stage of the backing process, to ensure the horse remains calm and obedient. Overshadowing works by making the fearful stimuli (the rider in this case) redundant by not allowing the flight response to take over.
Step 3 - Transfer of Signals
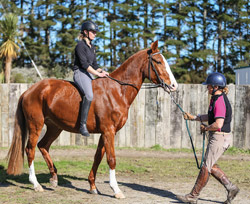 By this stage the horse has already learnt the step forward and back cues from the groundwork. The next step is to get the horse to associate these cues with the cues the rider will issue from on board – this is done through a joint process of classical conditioning and negative reinforcement.
The rider asks the horse to go from a leg aid whilst the handler gently pulls forward on the leadrope. Both pressures are released at the onset of the correct behaviour. Soon the horse learns the leg aid on its own, and the same goes for the slow / stop / step back signals.
Teaching turn can be tricky and Jody prefers to teach this on the ground first. Standing on either side of the neck she teaches the horse that pressure on one side of the mouth goes away when the horse abducts (opens) the front leg away. This aid is easily replicated once on board the horse.
Step 4 - Saddling up: Habituation to the girth
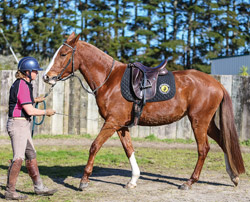 For some horses this is the very hardest part of the starting procedure. If this stage is not done well the horse can become girth-shy, girth-proud or cold backed – these are terms used to describe horses who do not relax when there is girth pressure around their abdomen. It is critical at this stage that the horse is habituated slowly and carefully, step by step and is never allowed to run around with tension and bucking. Allowing this to happen may form permanent flight associations in the horse’s brain which are impossible to erase.
It is best to put the saddle on in a round pen or small yard / stable where his flight will be limited. Girth the horse up slowly and carefully and overshadow each step of the process with step backs from the rein and whip aids until he is calm and confident. Do not assume that just because the horse stands still and seems to tolerate the girth that the horse is relaxed. Instead the horse may be rooted to the spot in fear and may explode when allowed forward.
Overshadowing the girth in the same fashion as the rider was overshadowed to mount gives the horse every chance of a successful habituation. The horse can be introduced to the stirrups flapping the same way, stepping him back and forwards whilst they are being gently banged against the saddle flaps.
Once the horse is girthed up tight enough that the saddle will not slip but not so tight as to be uncomfortable, he can be walked forward, halted and stepped back a few times before being allowed to trot out around the round pen and get used to the feeling of the saddle. It is best to have a lunge line on the horse to do immediate downward transitions if the horse tries to run or buck. Sending the horse forward at the time he bucks risks embedding the flight response further.
Step 5 - Initial riding under saddle: putting it all together
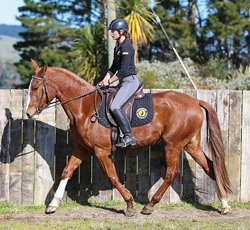 Once the horse is habituated to the saddle it is simply a matter of putting two and two together by adding the rider. This stage normally runs very smoothly as the horse will have been ridden bareback on quite a few occasions and had the saddle on a few times too. The horse will remember the signals installed bareback and fairly quickly you should have a horse that will walk, stop, step back and turn left and right for you. The next step is to leave the round pen and venture out and about or stay in the round pen a day longer to get trot, and even canter, established.
It is important to train the legs of the horse first. Worry about the head carriage in the following weeks. Roundness is actually an emergent quality of having good stop, go and turn responses as well as a straight horse. If roundness is focused on too early the horse can become confused due to the blurring of the stop response and conflict behaviours such as shying may emerge.
It is also vital to train self carriage every step of the way – the horse should not speed up unless asked, nor should it slow down or swerve left or right unless cued by the rider, but the horse must also never be held by the rider’s leg and rein pressures.
Step 6 - Proof: riding out and about
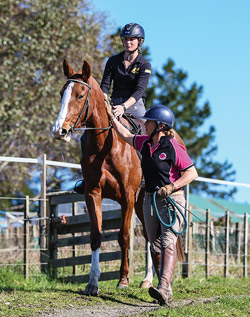 The first canter is normally undertaken about the third day out of the round pen. Rather than give a specific aid, Jody prefers to run the trot fast then practice “emergency brakes” once or twice before using the clicking of the tongue and a little leg to get the first canters. Later on when the horse is comfortable with cantering a more specific signal can be used. Jody also believes that avoiding cantering the young horse within the first weeks of backing can be a mistake – it is nothing to be scared of or avoided!
Likewise it is great to get the horse out and about over varying terrain as soon as possible and to introduce it to different situations such as the beach and quiet roads. It is always safest to have a handler on the ground or up on another horse to aid with calmness and control when necessary.
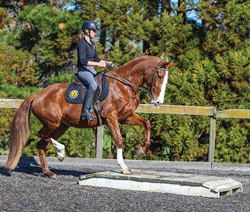 To further proof your training the young horse can be taught to walk over bridges and kick a horseball to improve its confidence and proof test its go, stop and turn cues.
- Photos and article used with kind permission of Show Circuit Magazine